Products
Pimoroni Enviro+ Environmental Monitoring Station for Raspberry Pi
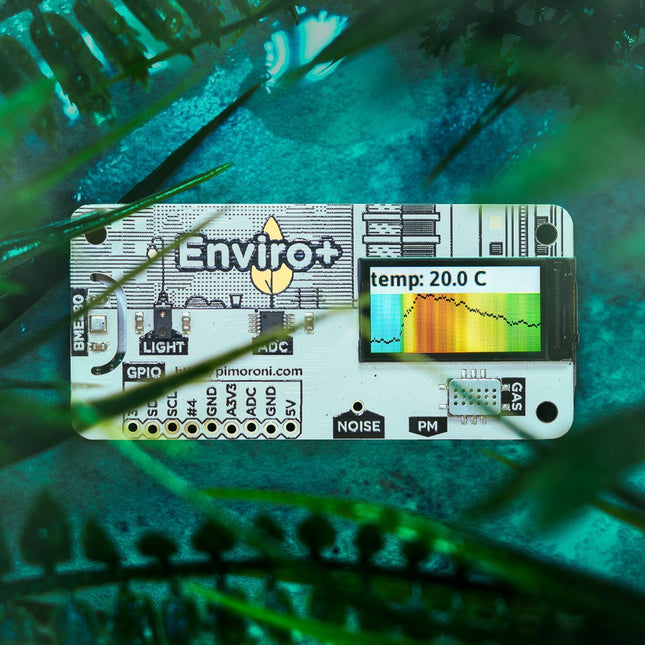
Designed for environmental monitoring, Enviro+ lets you measure air quality (pollutant gases and particles*), temperature, pressure, humidity, light, and noise level. Enviro+ is an affordable alternative to environmental monitoring stations that can cost tens of thousands of pounds and, best of all, it's small and hackable and lets you contribute your data to citizen science efforts to monitor air quality via projects like Luftdaten. Features BME280 temperature, pressure, humidity sensor (datasheet) LTR-559 light and proximity sensor (datasheet) MICS6814 analog gas sensor (datasheet) ADS1015 analog to digital converter (ADC) (datasheet) MEMS microphone (datasheet) 0.96' colour LCD (160 × 80) pHAT-format board Fully-assembled Compatible with all 40-pin header Raspberry Pi models Pinout Python library Citizen science air quality monitoring This board was developed in collaboration with the University of Sheffield, with the aim of letting you contribute real-time air quality data from your local area to open data projects like Luftdaten. Devices like Enviro+ allow fine-grained, detailed datasets that let us see shifts in air quality through time and across different areas of cities. The dataset gets better in quality every time an additional The more devices that contribute data, the better quality the dataset becomes. Particulate matter (PM) is made up of tiny particles that are a mix of sizes and types, like dust, pollen, mould spores, smoke particles, organic particles and metal ions, and more. Particulates are much of what we think of as air pollution. The analog gas sensor can be used to make qualitative measurements of changes in gas concentrations, so you can tell broadly if the three groups of gases are increasing or decreasing in abundance. Without laboratory conditions or calibration, you won't be able to say 'the concentration of carbon monoxide is n parts per million', for example. Temperature, air pressure and humidity can all affect particulate levels (and the gas sensor readings) too, so the BME280 sensor on Enviro+ is really important to understanding the other data that Enviro+ outputs. You can implement Enviro+ in IoT applications as well. By connection it to Alexa you can get information about the temperature and humidity of the air by simply asking, or there's also an option to set up a trigger action with IFTTT that turns your Philips Hue lights on when the light level drops below a certain level etc. Software With the Python library you can control control all the parts of your Enviro+. There's a bunch of examples for each of the individual parts, an all-in-one example that shows you the data from Enviro+'s sensors in a visual way.
€ 64,95
Members € 58,46
Pimoroni Fan SHIM - Active Cooling for Raspberry Pi 4
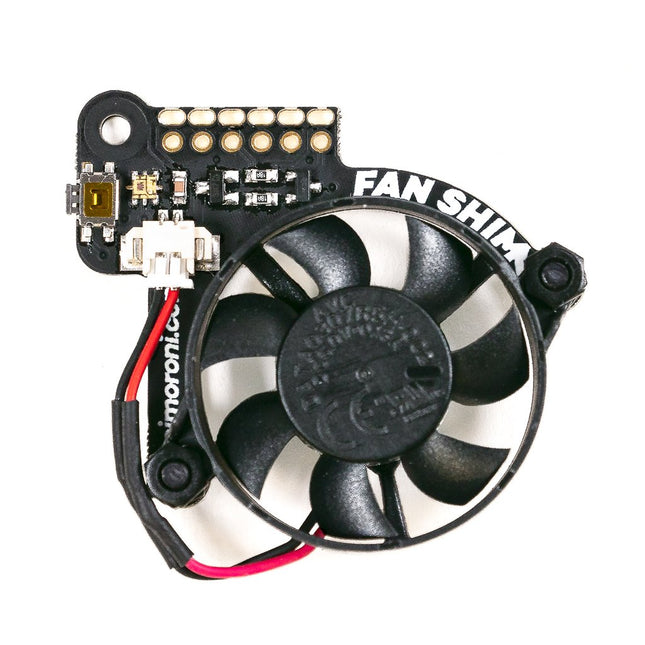
When Raspberry Pi 4's system on chip (SoC) achieves a certain temperature, it lowers its operating speed to protect itself from harm. As a result, you don't get maximum performance from the single board computer. Fan SHIM is an affordable accessory that effectively eliminates thermal throttling and boosts the performance of RPi 4. It's quite easy to attach the fan SHIM to Raspberry pi: fan SHIM uses a friction-fit header, so it just slips onto your Pi's pins and it's ready to go, no soldering required! The fan can be controlled in software, so you can adjust it to your needs, for example, toggle it on when the CPU reaches a certain temperature etc. You can also program the LED as a visual indicator of the fan status. The tactile switch can also be programmed, so you can use it to toggle the fan on or off, or to switch between temperature-triggered or manual mode. Features 30 mm 5 V DC fan 4,200 RPM 0.05 m³/min air flow 18.6 dB acoustic noise (whisper-quiet) Friction-fit header No soldering required RGB LED (APA102) Tactile switch Basic assembly required Compatible with Raspberry Pi 4 (and 3B+, 3A+) Python library and daemon Pinout Scope of delivery Fan SHIM PCB 30 mm 5 V DC fan with JST connector M2.5 nuts and bolts Assembly The assembly is really simple and almost takes no time With the component side of the PCB facing upwards, push the two M2.5 bolts through the holes from below, then screw on the first pair of nuts to secure them and act as spacers. Push the fan's mounting holes down onto the bolts, with the cable side of the fan downwards (as pictured) and the text on the fan upwards. Attach with another two nuts. Push the fan's JST connector into the socket on Fan SHIM. Software With the help of Python library you can control the fan (on/off), RGB LED, and switch. You'll also find a number of examples that demonstrate each feature, as well as a script to install a daemon (a computer program that runs as a background process) that runs the fan in automatic mode, triggering it on or off when the CPU reaches a threshold temperature, with a manual override via the tactile switch.
€ 13,95
Members € 12,56
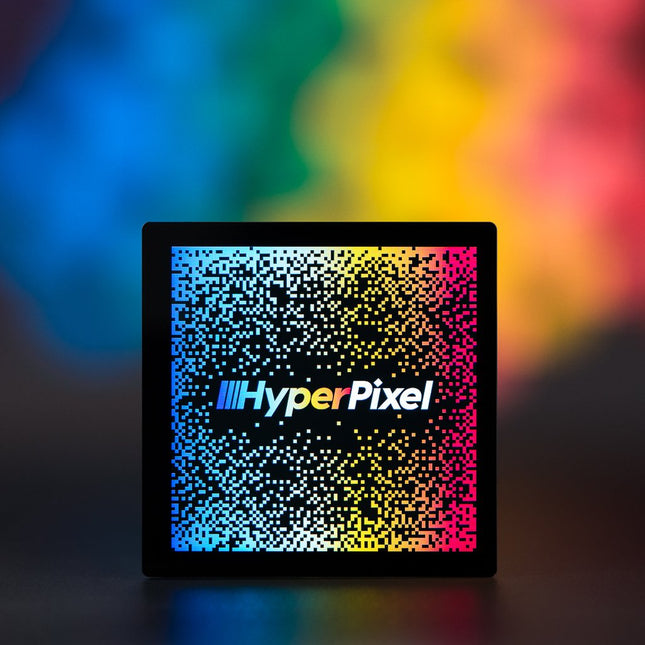
Pimoroni HyperPixel 2.1 Round - Hi-Res Display for Raspberry Pi
HyperPixel 2.1 Round has all the great features of other HyperPixels – crisp, brilliant IPS display touchscreen, and high-speed DPI interface – it's just rounder! You can use it with any Raspberry Pi with a 40-pin header but it works particularly nicely with the RPi Zero footprint – it's designed so you can mount a Zero neatly behind it, so you can't see the RPi when you look at it from the front.This version of HyperPixel would be great for custom interfaces and control panels – mounted on a wall it would make a really neat, minimalist smart home controller or a stylish 'what's playing' display for your sound system. Everything is pre-soldered and ready to go, just pop it onto your RPi, install the software, and away you go!HyperPixel 2.1 Round uses a high-speed DPI interface, allowing it to shift 5x more pixel data than the usual SPI interface that these small Pi displays normally use. It has a 60 FPS frame rate and a resolution of approximately 229 pixels per inch (480x480px) on its 2.1' display. The display can show 18-bits of colour (262,144 colors).Features High-speed DPI interface 2.1' IPS (wide viewing angle, 175°) display 480x480 pixels, minus the corners (~229 PPI) 18-bit colour (262,144 colors) 60 FPS frame rate Active area: 53.28 x 53.28 mm Capacitive touchscreen (with Python library) Compatible with all 40-pin header Raspberry Pi models Dimensions: 71.80 x 71.80 x 10.8 mm (WxHxD, depth includes header and display). With a RPi Zero attached with short standoffs, the total depth is 17 mm. Downloads Display library for Raspberry Pi OS Python touchscreen library Dimensional drawing Pinout
€ 79,95
Members € 71,96
Pimoroni HyperPixel 4.0 - Hi-Res Display for Raspberry Pi (Touch Version)
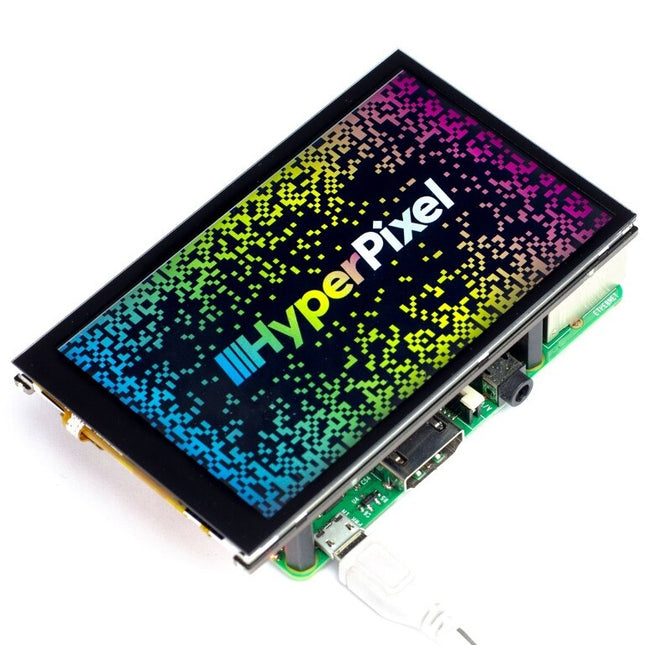
HyperPixel 4.0 is the perfect way to use your RPi without a bunch of cables or a bulky display. Design your own interface to control your project, display data, or turn your Pi into a tiny media centre. This version of HyperPixel has a gorgeous IPS display, with wide viewing angles, custom-made cover glass, and the alternate I²C interface is broken out for advanced users. Features High-speed DPI interface 4.0' IPS (wide viewing angle, 160°) display (86.4 x 51.8 mm) 800x480 pixels (~235 PPI) 18-bit colour (262,144 colors) 60 FPS frame rate Contrast ratio: 500:1 Capacitive touch 40-pin female header included to boost height for Raspberry Pi B+, 2, 3, 3B+ and 4 Standoffs included to securely attach to your RPi Compatible with all 40-pin header Raspberry Pi models One-line installer Dimensions: 58.5 x 97 x 12 mm (WxHxD, depth includes header and display) HyperPixel uses a high-speed DPI interface, allowing it to shift 5x more pixel data than the usual SPI interface that these small Pi displays use. It has a 60 FPS frame rate and a resolution of approximately 235 pixels per inch (800x480) on its 4.0' display. The display can show 18-bits of colour (262,144 colors). This Touch version has a capacitive touch display that's more sensitive and responsive to touch than a resistive touch display, and it's capable of multi-touch! Everything comes fully-assembled, and there's no soldering required! The display is securely stuck down to the HyperPixel 4.0 PCB and connected via a neat little flush-mounting FPC cable. Just pop HyperPixel 4.0 on your RPi and run our installer to get everything set up! Please note: when installing HyperPixel 4.0 onto your RPi make sure not to press down on the screen surface! Hold the board by its edges and wiggle it to mate with the extended header (or GPIO header). Also take care not to pull on the edges of the glass display when removing your HyperPixel. It'll work with any 40-pin version of the RPi, including RPi Zero and RPi Zero W. If you're using it with a larger RPi then use the extra 40-pin header that's included to boost it up to the required height. If you're using a Zero or Zero W then just pop it straight onto the GPIO. The included standoff kit allows you to mount your HyperPixel 4.0 safely and securely to your RPi. Just screw them into the posts on the underside of the HyperPixel 4.0 PCB and then secure with screws through the mounting holes on your RPi. Downloads GitHub
€ 79,95
Members € 71,96
Pimoroni HyperPixel 4.0 Square Touch - Hi-Res Display for Raspberry Pi
HyperPixel 4.0 Square has all the great features of our standard HyperPixel 4.0 – a crisp, brilliant IPS display with touchscreen, and high-speed DPI interface – it's just more square!This square version of HyperPixel 4.0 is great for custom interfaces and control panels, and works really well for Pico-8 games. Everything is pre-soldered and ready to go, just pop it onto your RPi, run our installer, and away you go!Features High-speed DPI interface 4.0' IPS (wide viewing angle, 160°) display (72x72 mm) 720x720 pixels (~254 PPI) 18-bit colour (262,144 colors) 60 FPS frame rate Optional capacitive touchscreen 40-pin female header included to boost height for Raspberry Pi B+, 2, 3, 3B+ and 4 Standoffs included to securely attach to your RPi Compatible with all 40-pin header Raspberry Pi models One-line installer HyperPixel 4.0 Square uses a high-speed DPI interface, allowing it to shift 5x more pixel data than the usual SPI interface that these small RPi displays normally use. It has a 60 FPS frame rate and a resolution of approximately 254 pixels per inch (720x720px) on its 4.0' display. The display can show 18-bits of colour (262,144 colors).This Touch version has a capacitive touch display that's more sensitive and responsive to touch than a resistive touch display, and it's capable of multi-touch!Please note: when installing HyperPixel 4.0 Square onto your RPi make sure not to press down on the screen surface! Hold the board by its edges and wiggle it to mate with the extended header (or GPIO header). Also take care not to pull on the edges of the glass display when removing your HyperPixel.It'll work with any 40-pin version of the RPi, including RPi Zero and RPi Zero W. If you're using it with a larger RPi then use the extra 40-pin header that's included to boost it up to the required height. If you're using a Zero or Zero W then just pop it straight onto the GPIO.The included standoff kit allows you to mount your HyperPixel 4.0 Square safely and securely to your RPi. Just screw them into the posts on the underside of the HyperPixel 4.0 Square PCB and then secure with screws through the mounting holes on your RPi.DownloadsGitHub
€ 94,95
Members € 85,46
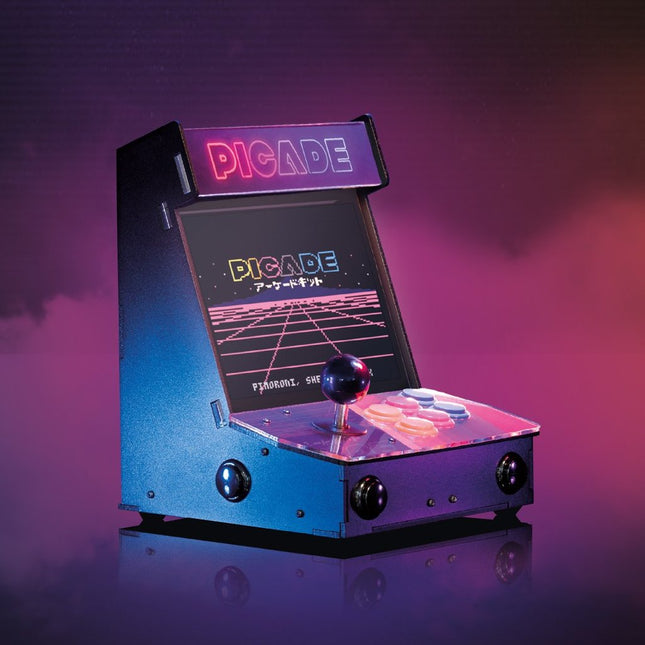
Pimoroni Picade Desktop Retro Arcade Machine (10-inch Display)
With the Picade Desktop Retro Arcade Machine (10-inch Display) you can build your very own arcade machine. Cabinet Features Black, powder-coated panels Joystick with black ball top Acrylic marquee and console with authentic artwork Dedicated illuminated power button Push-fit arcade buttons Easy access with removable back panel 3' speaker (5 W, 4 Ω) Grippy rubber feet Dimensions: 350 x 230 x 210 mm 1024x768 (4:3 ratio) IPS (wide viewing angle) display Pimoroni-designed and manufactured HDMI display driver board and keypad controls Powered by micro-USB cable (included) from your Pi Picade X HAT Features Easy DuPont connectors for buttons and joystick Push-fit speaker terminals USB-C power management, power switch pins, and power button I²S audio DAC with 3 W amplifier (mono) 4-way joystick inputs 4 utility buttons 6 player buttons Metal standoffs to hold your Picade X HAT securely Included Picade enamel pin badge Pimoroni Super Sticker Selection Picade poster/assembly instructions Please note: You will need to add a Raspberry Pi, USB-C power supply, and a MicroSD Card.
€ 349,00
Members € 314,10
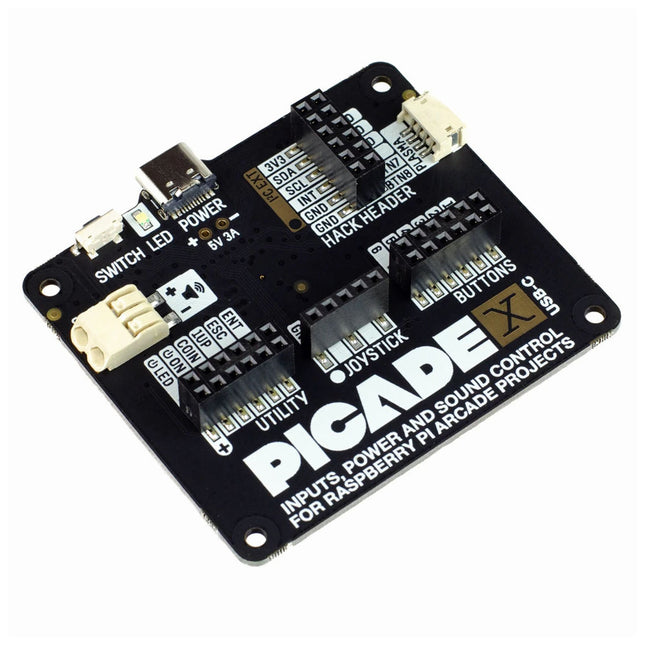
Pimoroni Picade X HAT USB-C
Turn your Raspberry Pi into a retro games console! Picade X HAT includes joystick and button inputs, a 3 W I²S DAC/amplifier, and soft power switch. This HAT has all the same great features as the original Picade HAT but now has no-fuss female Dupont connectors to hook up your joystick and buttons. Simply pop Picade X HAT onto your Pi, plug a USB-C power supply into the connector on the HAT (it back-powers your Pi through the GPIO, so no need for a separate power supply), wire up your controls, and install the driver! It's ideal for your own DIY arcade cabinet builds, or for interfaces that need big, colourful buttons and sound. Features I²S audio DAC with 3 W amplifier (mono) and push-fit terminals Safe power on/off system with tactile power button and LED USB-C connector for power (back-powers your Pi) 4-way digital joystick inputs 6x player button inputs 4x utility button inputs 1x soft power switch input 1x power LED output Plasma button connector Breakout pins for power, I²C, and 2 additional buttons Picade X HAT pinout Compatible with all 40-pin Raspberry Pi models The I²S DAC blends both channels of digital audio from the Raspberry Pi into a single mono output. This is then passed through a 3 W amplifier to power a connected speaker. The board also features a soft power switch that allows you turn your Pi on and off safely without risk of SD card corruption. Tap the connected button to start up, and press and hold it for 3 seconds to fully shutdown and disconnect power. Software/Installation Open a terminal and type curl https://get.pimoroni.com/picadehat | bash to run the installer. You'll need to reboot once the installation is complete, if it doesn't prompt you to do so. The software does not support Raspbian Wheezy Notes With USB-C power connected through Picade X HAT you'll need either to tap the connected power button or the button marked 'switch' on the HAT to power on your Pi.
€ 24,95€ 19,95
Members identical

Pimoroni PicoVision (incl. Pico W)
PicoVision is a powerful digital video stick for bold audio visual adventures, with dual RP2040 chips and a conveniently HDMI-shaped output connector to boot. Use PicoVision to make and run your own homebrew games, draw digital art, recreate beloved demos, screensavers or WinAmp visualisations, visualise data, subvert advertising billboards, emulate CeeFax or whip up signage. GPU (RP2040)Does all the heavy-lifting to display buttery-smooth, high-res, animations on your TV or monitor via HDMI. CPU (Pico W)Runs your code and provides an interface to other gadgets through USB, Wi-Fi, and Bluetooth. HDMI connectorMake use of TVs, monitors, giant projectors, or even tiny displays for building into a cosplay outfit. Line out audioBash out some bleeps and bloops! This digital audio interface can produce some quality noise. microSD cardNever run out of space for your lovely assets by adding a sizeable microSD card to your setup. Qw/ST connectorAdd sensors or other types of breakout to your project so they can react to the world around them. On-board reset and user buttonsCreate a simple user interface for your project without needing to add any extras. You can program PicoVision using C++ or MicroPython. C++ will get you the best performance, but if you're a beginner we'd recommend MicroPython for ease of getting started. Either way, you'll have access to PicoGraphics libraries which will let you easily manipulate shapes, text and images, some exciting new vector graphics and font functionality courtesy of PicoVector, and the ability to make bleeps, bloops and other fun electronic noise with PicoSynth. Features Raspberry Pi Pico W (CPU) Dual Arm Cortex M0+ with 264 kB of SRAM 2 MB of QSPI flash supporting XiP 2.4 GHz wireless / Bluetooth 5.2 RP2040 (GPU) Another dual Arm Cortex M0+ with 264 kB of SRAM Higher resolution modes use significant GPU overclocking Connects to the CPU as an I²C peripheral device 2x 8 MB PSRAM chips for frame double-buffering Digital Video out via HDMI connector PCM5100A DAC for line level audio over I²S, wired to a 3.5 mm stereo jack MicroSD card slot 3x user buttons (one wired to CPU, two to GPU) Reset button Status LED (GPU) Qw/ST (Qwiic/STEMMA QT) connector Fully-assembled (no soldering required) Spare/extra pins broken out as unpopulated headers (these require soldering) C++/MicroPython libraries Downloads Pinout Schematics MicroPython for PicoVision MicroPython examples and documentation
€ 47,95
Members € 43,16
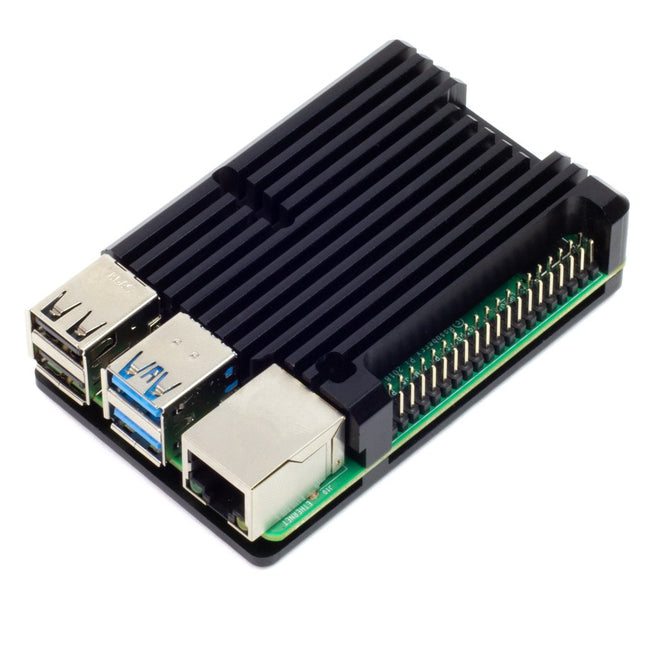
Pimoroni Pimoroni Aluminium Heatsink Case for Raspberry Pi 4
This anodised aluminium heatsink case will protect your Raspberry Pi 4 and give you very effective passive cooling. It's great in cases where you want completely silent cooling, for instance, if you're building a home media center. The scope of delivery includes a thermal pad to provide thermal contact between the CPU and top case, and a handy Allen key and set of hex bolts to attach the case together. The case gives you access to all of the ports, pins, and connectors. Features Anodised aluminium top and bottom case Heatsink fins Thermal pad Hex bolts and Allen key included Access to all ports, pins, and connectors Compatible with Raspberry Pi 4 Assembly Assembling your heatsink case is pretty easy and should only take a couple of minutes. The first, and most important thing is to make sure that your Pi is powered off and unplugged before you fit the case. Take one of the thermal pads and peel the protective films off both sides of it (there's a white film and an easy-to-miss clear film on the other side. Stick the thermal pad onto your Pi's CPU (the metal square nearest the middle of the PCB). Sticking the thermal pad to the CPU first is a much better way to position it correctly than trying to stick it to the case. Only use one thermal pad with the Raspberry Pi 4. Position the top case and then, holding it in place, flip the whole thing over and position the bottom case on the underside of your Pi. Use the four hex bolts and allen key to secure the case. Notes The case is metal and hence conductive, so be careful not to short any components on it, and ensure that your RPi is powered off and unplugged when fitting the case It may be obvious, but the case will get hot in use Dimensions: 87 × 56 × 25.5 mm
€ 17,95
Members € 16,16
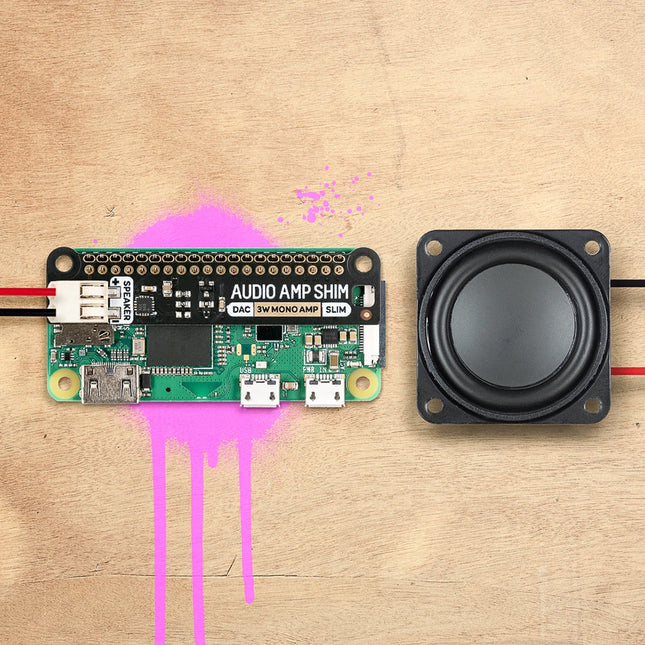
Pimoroni Pimoroni Audio Amp SHIM (3 W Mono Amp)
SHIM is an old Yorkshire term meaning 'Shove Hardware In Middle' - we use it for Raspberry Pi add-ons that are designed to be sandwiched between your Pi and a HAT or mini HAT. This one has a clever friction fit header that slips handily over your GPIO pins, doesn't need soldering*, and is easily removable. The MAX98357A combined DAC / amplifier chip takes high-quality digital audio from your Pi and amplifies it so it can be used with an unpowered speaker. The push-fit connectors make it straightforward to connect up your speaker, whether it's a bookshelf or floor-standing speaker, the speaker in an old radio, or any other speaker you might have laying around. Because Audio Amp SHIM adds no extra bulk to your Pi it's perfect for building into a compact enclosure - you could use it to make a tiny MP3 player to play local files or stream from services like Spotify, give a vintage radio the ability to play digital radio streams or incorporate bleepy noises into your very own retro handheld. It's also a handy way to add audio output to your Pi Zero or Pi 400! Please note: Raspberry Pi and speakers are not included with this board. Features MAX98357A DAC / amplifier chip Mono 3W audio out Push-fit speaker terminals SHIM-format board with friction-fit connectors 2x mounting holes (M2.5) for if you want to secure everything together with bolts Fully-assembled No soldering required (*unless you're using a Pi that comes without a header) Compatible with all 40-pin header Raspberry Pi models Software The easiest way to get everything set up is to use Pimoroni's Pirate Audio software and installer which configures I2S audio, as well as installing Mopidy and our custom Pirate Audio plugins which will let you stream Spotify and play local files. Here's how to get started: Set an SD card up with the latest version of Raspberry Pi OS. Connect to Wi-Fi or a wired network. Open a terminal and type the following:git clone https://github.com/pimoroni/pirate-audiocd pirate-audio/mopidysudo ./install.sh Reboot your Pi Downloads MAX98357A Datasheet Pirate Audio software Schematic
€ 14,95
Members € 13,46
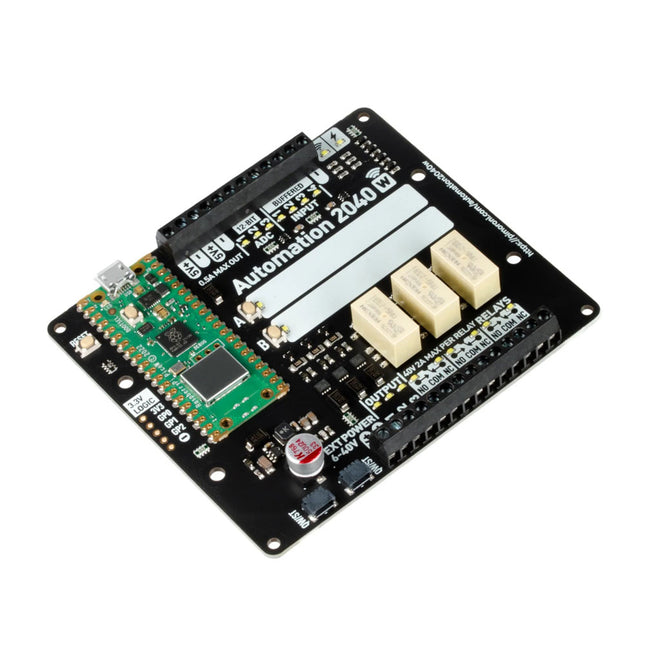
Pimoroni Pimoroni Automation 2040 W (incl. Pico W)
An all-in-one, Pico W powered industrial/automation controller with 2.46 GHz wireless connectivity, relays and a plethora of inputs and outputs. Compatible with 6 V to 40 V systems. Automation 2040 W is a Pico W / RP2040 powered monitoring and automation board. It contains all the great features from the Automation HAT (relays, analog channels, powered outputs and buffered inputs) but now in a single compact board and with an extended voltage range so you can use it with more devices. Great for controlling fans, pumps, solenoids, chunky motors, electronic locks or static LED lighting (up to 40 V). All the channels (and the buttons) have an associated indicator LED so you can see at a glance what's happening with your setup, or test your programs without having hardware connected. Features Raspberry Pi Pico W Aboard Dual Arm Cortex M0+ running at up to 133 Mhz with 264 kB of SRAM 2 MB of QSPI flash supporting XiP Powered and programmable by USB micro-B 2.4 GHz wireless 3x 12-bit ADC inputs up to 40 V 4x digital inputs up to 40 V 3x digital sourcing outputs at V+ (supply voltage) 4 A max continuous current 2 A max current at 500 Hz PWM 3x relays (NC and NO terminals) 2 A up to 24 V 1 A up to 40 V 3.5 mm screw terminals for connecting inputs, outputs and external power 2x tactile buttons with LED indicators Reset button 2x Qw/ST connectors for attaching breakouts M2.5 mounting holes Fully assembled No soldering required. C/C++ and MicroPython libraries Schematic Dimensional drawing Power Board is compatible with 12 V, 24 V and 36 V systems Requires supply 6-40 V Can provide 5 V up to 0.5 A for lower voltage applications Software Pirate-brand MicroPython Getting Started with Raspberry Pi Pico MicroPython examples MicroPython function reference C++ examples C++ function reference Getting Started with Automation 2040 W
€ 84,95
Members € 76,46
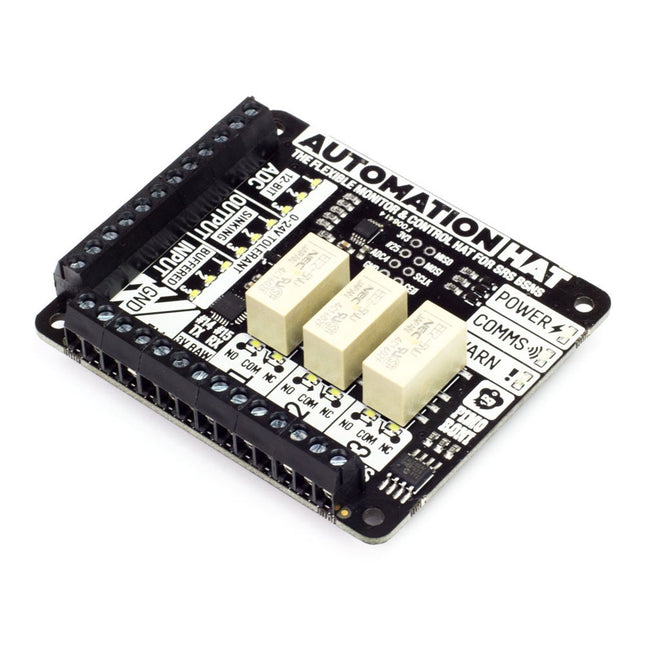
Pimoroni Pimoroni Automation HAT
Take control of and monitor your world with our ultimate jack-of-all-trades Raspberry Pi HAT!We've pulled together a great set of features into this home monitoring and automation controller. With relays, analog channels, powered outputs, and buffered inputs (all 24 V tolerant) you can now hook up a plethora of goodies to your Raspberry Pi all at once.Better still each channel has an indicator LEDs which means at a glance you can see what's happening with your setup. Even the analog channels have dimming LEDs that allow you to see the value they are currently sensing – swish!Ideal for smart home and automation projects, giving your greenhouse intelligent sprinklers, or scheduling your fish feeding!Features 3x 24 V @ 2 A relays (NC and NO terminals) 3x 12-bit ADC @ 0-24 V (±2% accuracy) 3x 24 V tolerant buffered inputs 3x 24 V tolerant sinking outputs 15x channel indicator LEDs 1x 12-bit ADC @ 0-3.3 V 3.5 mm screw terminals Power, Comms, and Warn! LED indicators SPI, TX (#14), RX (#15), #25 pins broken out Automation HAT pinout Compatible with all 40-pin header Raspberry Pi models Python library Schematic Comes fully assembled (broken out pins require soldering) SoftwareAs ever, we've made a super-simple to use Python library to take advantage of Automation HAT's multitudinous functions, with examples to get you started.Our input, output and relay examples show you how to read the analog and digital inputs, switch the outputs on and off, and control the relays.Notes We recommend you use a set of brass M2.5 standoffs with Automation HAT to avoid pins contacting the HDMI port if the HAT is pushed down Loads for the buffered outputs should be switched on the ground side, i.e. 12/24 V (from supply) -> load -> output terminal -> ground (from supply) The relays can tolerate up to 2 A each and should be switched on the high side The sinking outputs can sink a maximum 500 mA total across the 3 outputs, so if you use a single channel you can sink the whole 500 mA across it. The accuracy of the ADC is ±2%. Do not use to switch mains voltages!
€ 39,95
Members € 35,96

Pimoroni Pimoroni Badger 2040
Badger 2040 is a hackable, programmable badge with E Ink display, powered by Raspberry Pi RP2040.The Badger 2040 is equipped with plenty of buttons so you can easily change what's displayed on the screen, a slot so you can clip it onto a lanyard and a battery connector so you can keep things portable and refresh the screen whilst on the go.Here are some things you could do with it! Switch between images, pronouns or secret identities at the push of a button Make yourself into a mobile weather station or air quality monitor (by adding a sensor breakout) Store important QR codes for getting into places (or to Rickroll people) Make a tiny to-do list and tick stuff off Display inspirational badger quotes or educational badger facts of the day Want to show your Badger the world? We've put together a convenient Badger + Accessory Kit which contains batteries, a lanyard and everything else that's needed to get portabello.Features 2.9' black and white E Ink display (296 x 128 pixels) Ultra wide viewing angles Ultra low power consumption Dot pitch – 0.227 x 0.226 mm Powered by RP2040 (Dual Arm Cortex M0+ running at up to 133 Mhz with 264 kB of SRAM) 2 MB of QSPI flash supporting XiP Five front user buttons Reset and boot buttons (the boot button can also be used as a user button) White LED USB-C connector for power and programming JST-PH connector for attaching a battery (input range 2.7-6 V) High-precision voltage reference for battery level monitoring Qw/ST (Qwiic/STEMMA QT) connector Fully-assembled (no soldering required) Schematic Mechanical drawing C++/MicroPython libraries SoftwareBecause it's a RP2040 board, Badger 2040 is firmware agnostic! You can program it with C/C++, MicroPython or CircuitPython.C++/MicroPython libraries contain some nifty software tweaks to let you get the most out of your Badger. You'll get best performance using C++, but if you're a beginner we'd recommend using our batteries included MicroPython build for ease of getting started. Download Pirate brand MicroPython (special Badger edition) Getting Started with Badger 2040 C++ examples MicroPython examples MicroPython function reference You can also use CircuitPython on your Badger 2040. CircuitPython drivers are designed to work on a bunch of different microcontrollers so you won't get the fancy RP2040-architecture specific tweaks that you'll find in the library, but you will get access to all the nice conveniences of Adafruit's ecosystem. Download CircuitPython for Badger 2040 Getting Started with CircuitPython CircuitPython examples BadgerOS ported to CircuitPython by Stephane BeBoX
€ 39,95
Members € 35,96

Pimoroni Pimoroni Breakout Garden for Raspberry Pi (I²C)
Thanks to its six sturdy slots, Breakout Garden enables the users to simply plug and play with various tiny breakout board.Just insert one or more boards into the slots in the Breakout Garden HAT and you’re ready to go. The mini breakouts feel secure enough in the edge-connector slots and are very unlikely to fall out.There are a number of useful pins along the top of Breakout Garden, which lets you connect other devices and integrate them into your project.You shouldn't be worried if you insert a board the wrong way thanks to provided reverse polarity protection. It doesn't matter which slot you use for each breakout either, because the I²C address of the breakout will be recognised by the software and it'll detect them correctly in case you move them around.Features Six sturdy edge-connector slots for Pimoroni breakouts 0.1” pitch, 5 pin connectors Broken-out pins (1 × 10 strip of male header included) Standoffs (M2.5, 10 mm height) included to hold your Breakout Garden securely Reverse polarity protection (built into breakouts) HAT format board Compatible with Raspberry Pi 3 B+, 3, 2, B+, A+, Zero, and Zero W It's suggested using the included standoffs to attache Breakout Garden to your Raspberry Pi.SoftwareBreakout Garden doesn't require any software of its own, but each breakout you use will need a Python library. On the Breakout Garden GitHub page you'll find an automatic installer, which will install the appropriate software for a given breakout. There are also some examples that show you what else you can do with Breakout Garden.
€ 19,95
Members € 17,96
Pimoroni Pimoroni Display HAT Mini for Raspberry Pi Zero
Display HAT Mini features a bright 18-bit capable 320x240 pixel display with vibrant colours and formidable IPS viewing angles, connected via SPI. It's got four tactile buttons for interacting with your Raspberry Pi with your digits and a RGB LED for notifications. A QwST connector (Qwiic / STEMMA QT) and a Breakout Garden header is also squeezed in so it's a doddle to connect up different kinds of breakouts. It will work with any model of Raspberry Pi with a 40 pin header, but we think it goes with the Raspberry Pi Zero particularly well - we've included a pair of standoffs so you can use to bolt HAT and Raspberry Pi together to make a sturdy little unit. To accommodate the screen Display HAT Mini is a bit bigger than a standard mini HAT or pHAT – it's around 5 mm taller than a Raspberry Pi Zero (so a Mini HAT XL or a Mini HAT Pro, if you will). Display HAT Mini lets you turn a Raspberry Pi into a convenient IoT control panel, a tiny photo frame, digital art display or gif-box, or a desktop display for news headlines, tweets, or other info from online APIs. This screen is a handy 3:2 ratio, useful for retro gaming purposes! Features 2.0” 320x240 pixel IPS LCD screen, connected via SPI (~220 PPI, 65K colours) 4x tactile buttons RGB LED Qw/ST (Qwiic/STEMMA QT) connector Breakout Garden / I²C header Pre-soldered socket header for attaching to Raspberry Pi Compatible with all models of Raspberry Pi with a 40-pin header. Fully assembled No soldering required (as long as your RPi has header pins attached). Dimensions: approx 65.5 x 35 x 9 mm (W x H x D, includes header and display). With a Raspberry Pi Zero attached with standoffs, the total depth is 17 mm. Screen usable area: 40.8 x 30.6 mm (L x W) Pinout Schematic Dimensional drawing Display HAT Mini Python library ST7789 Python library Included Display HAT Mini 2x 10 mm standoffs
€ 32,95
Members € 29,66
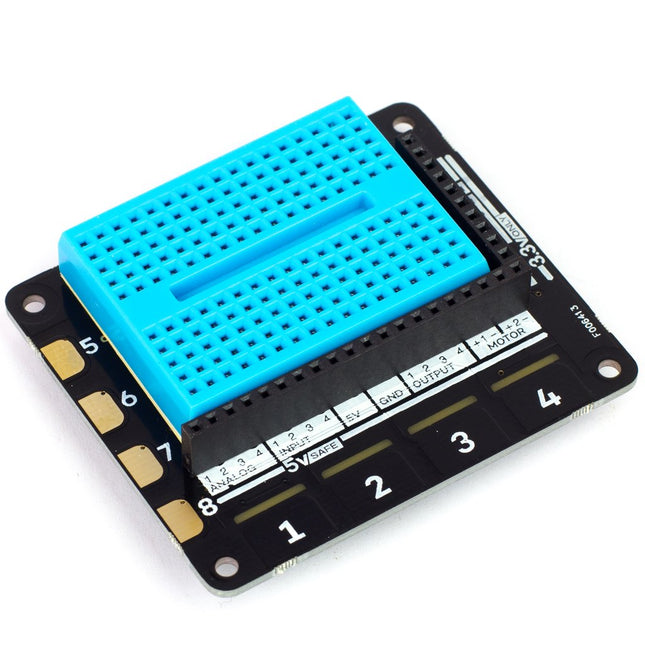
Pimoroni Pimoroni Explorer HAT Pro - Prototyping Board for Raspberry Pi
Possible applications of Explorer HAT Pro are development of little robots, games, science experiments, exploring small electronic circuits. You'll be able to interact with your Pi more extensively. Features Four buffered 5 V tolerant inputs (perfect for Arduino compatibility) Four powered 5 V outputs (up to 500 mA total across all four channels) Four capacitive touch pads (labelled 1, 2, 3, 4) Four capacitive crocodile clip pads (labelled 5, 6, 7, 8) Four coloured LEDs (red, green, blue, and yellow) Four analog inputs Two H-bridge motor drivers (up to 200 mA per channel; soft PWM control) A number of useful (unprotected) 3.3 V pins from the GPIO A mini breadboard on top! Explorer HAT Pro pinout Compatible with all 40-pin header Raspberry Pi models Python library Comes fully assembled Software The Python library contains a lot of examples that will help you quickly start with Explorer HAT Pro and show you the possibilities.

Pimoroni Pimoroni Inky Frame 4.0" (incl. Pico W)
Inky Frame 4.0' features a vibrant E Ink display with 640 x 400 pixels of tightly packed seven colour goodness – that's almost as many pixels as on the 5.7' Inky Frame, but squished tidily into a smaller footprint. There's five buttons with LED indicators for interacting with the display, two Qw/ST connectors for plugging in breakouts and a micro SD card slot for storage of capybara photos or other vital files. Every Inky Frame comes with a pair of sleek little metal legs so you can stand it up on your desk. There's also a battery connector so you can power it without annoying trailing wires, and some neato power saving features that mean you can run it from batteries for ages. Inky Frame 4.0' is great for: An ultra readable, low power consumption home automation dashboard Displaying stylised photos, pop art images or favourite comic panels. Showing cute graphs and readouts from local or wirelessly connected sensors Displaying fascinating data from online APIs. Features Raspberry Pi Pico W Aboard Dual Arm Cortex M0+ running at up to 133 Mhz with 264 kB of SRAM 2 MB of QSPI flash supporting XiP Powered and programmable by USB micro-B 2.4 GHz wireless 4.01' EPD display (640 x 400 pixels) E Ink Gallery Palette 4000 ePaper ACeP (Advanced Color ePaper) 7-color with black, white, red, green, blue, yellow, orange. Ultra wide viewing angles Ultra low power consumption Dot pitch – 0.135 x 0.135 mm 5x Tactile buttons with LED indicators Two Qw/ST connectors for attaching breakouts microSD card slot Dedicated RTC chip (PCF85063A) for deep sleep/wake Fully assembled (no soldering required) C/C++ and MicroPython libraries Schematic Included 1x Inky Frame 4.0' (incl. Pico W) 2x Metal legs Downloads MicroPython (Learn) Getting Started with Inky Frame (Readme) Installing MicroPython (Readme) MicroPython FAQs (and troubleshooting) Download pirate-brand MicroPython (you'll want the Inky Frame.uf2) MicroPython examples PicoGraphics function reference C/C++ C examples Picographics function reference
€ 99,95
Members € 89,96

Pimoroni Pimoroni Inky Frame 5.7" (incl. Pico W)
Inky Frame 5.7' features a nice, big seven color E Ink display with loads of space for displaying images, text, graphs or interfaces. There's five buttons with LED indicators for interacting with the display, two Qw/ST connectors for plugging in breakouts and a micro SD card slot for all-important storage of cat photos. Every Inky Frame comes with a pair of sleek little metal legs so you can stand it up on your desk (and a selection of mounting holes if you'd prefer to do something else). There's also a battery connector so you can power it without annoying trailing wires, and some neato power saving features that mean you can run it from batteries for ages. Inky Frame is great for: Checking your calendar and upcoming appointments at a glance Attaching to your office door to display your availability Displaying motivational posters, quotes, or images (fungible or otherwise) Showing readouts from other wirelessly connected environmental boards Features Raspberry Pi Pico W Aboard Dual Arm Cortex M0+ running at up to 133 Mhz with 264 kB of SRAM 2 MB of QSPI flash supporting XiP Powered and programmable by USB micro-B 2.4 GHz wireless 5.7' EPD display (600 x 448 pixels) E Ink Gallery Palette 4000 ePaper ACeP (Advanced Color ePaper) 7-color with black, white, red, green, blue, yellow, orange. Ultra wide viewing angle – >170° Dot pitch – 0.1915 x 0.1915 mm 5x Tactile buttons with LED indicators Two Qw/ST connectors for attaching breakouts microSD card slot Dedicated RTC chip (PCF85063A) for deep sleep/wake Fully assembled No soldering required. C/C++ and MicroPython libraries Schematic Included 1x Inky Frame 5.7' (incl. Pico W) 2x Metal legs Downloads MicroPython (Learn) Getting Started with Inky Frame (Readme) Installing MicroPython (Readme) MicroPython FAQs (and troubleshooting) Download pirate-brand MicroPython (you'll want the Inky Frame.uf2) MicroPython examples PicoGraphics function reference C/C++ C examples Picographics function reference
€ 109,95
Members € 98,96
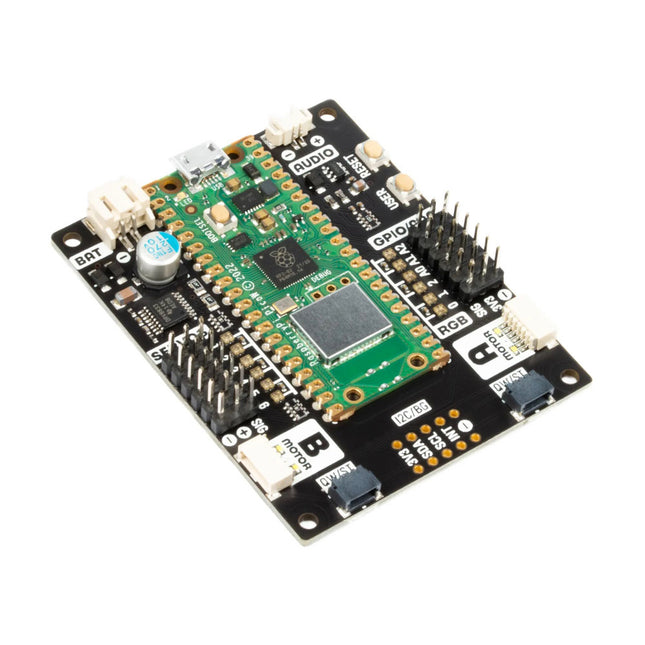
Pimoroni Pimoroni Inventor 2040 W (incl. Pico W)
Inventor 2040 W is a multi-talented board that does (almost) everything you might want a robot, prop or other mechanical thing to do. Drive a couple of fancy motors with encoders attached? Yep! Add up to six servos? Sure? Attach a little speaker so you can make noise? No problem! It's also got a battery connector so you can power your inventions from AA/AAA or LiPo batteries and carry your miniature automaton/animated top hat/treasure chest that growls at your enemies around with you untethered.You also get a ton of options for hooking up sensors and other gubbins – there's two Qw/ST connectors (and an unpopulated Breakout Garden slot) for attaching breakouts, three ADC pins for analog sensors, photoresistors and such, and three spare digital GPIO you could use for LEDs, buttons or digital sensors. Speaking of LEDs, the board features 12 addressable LEDs (AKA Neopixels) – one for each servo and GPIO/ADC channel.Features Raspberry Pi Pico W Aboard Dual Arm Cortex M0+ running at up to 133 Mhz with 264 kB of SRAM 2 MB of QSPI flash supporting XiP Powered and programmable by USB micro-B 2.4 GHz wireless 2 JST-SH connectors (6 pin) for attaching motors Dual H-Bridge motor driver (DRV8833) Per motor current limiting (425 mA) Per motor direction indicator LEDs 2 pin (Picoblade-compatible) connector for attaching speaker JST-PH (2 pin) connector for attaching battery (input voltage 2.5-5.5 V) 6 sets of header pins for connecting 3 pin hobby servos 6 sets of header pins for GPIO (3 of which are ADC capable) 12x addressable RGB LEDs/Neopixels User button Reset button 2x Qw/ST connectors for attaching breakouts Unpopulated headers for adding a Breakout Garden slot Fully assembled No soldering required (unless you want to add the Breakout Garden slot). C/C++ and MicroPython libraries Schematic Downloads Download pirate-brand MicroPython Getting Started with Raspberry Pi Pico Motor function reference Servo function reference MicroPython examples C++ examples
€ 44,95
Members € 40,46
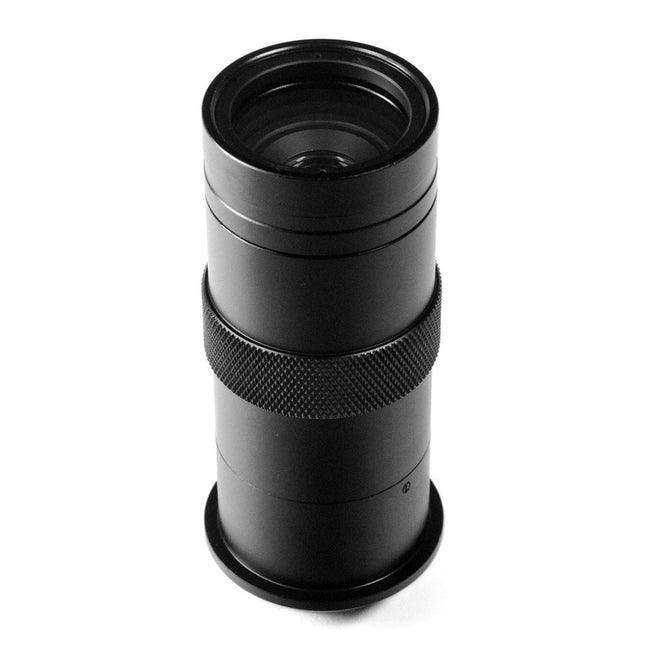
Pimoroni Pimoroni Lens for the Raspberry Pi High Quality Camera (0.12-1.8x)
It features a knurled adjustment ring to move the main lens for zoom-factor, you then focus by changing the distance to the subject. The satin-black main barrel has a diameter of 39mm nominal for the most part if you want to build a mount and it comes with 2 lens caps for the top and base. The whole lens is 107mm long.
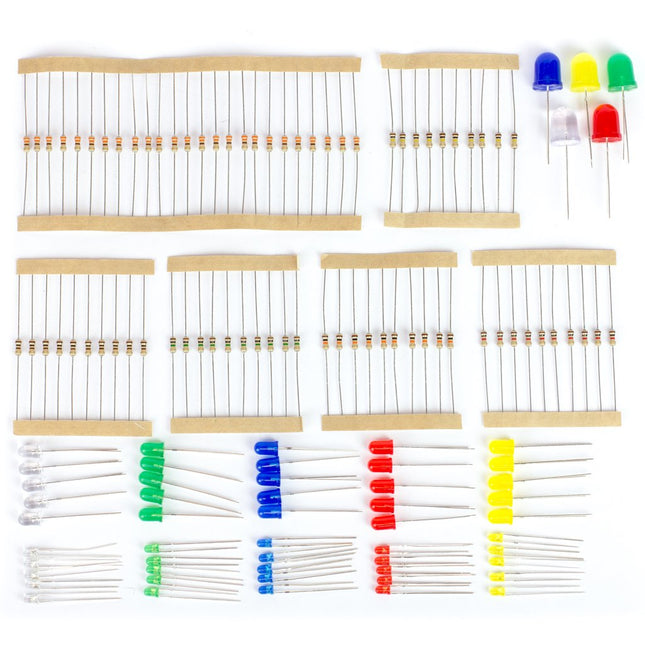
Pimoroni Pimoroni Maker Essentials - 50 colorful LEDs & Resistors
Add colors to your projects with this collection of red, green, yellow, blue and white LEDs. They come with various current limiting resistors in order to protect the parts and control the brightness.Included 10 mm LEDs 1x red 1x green 1x yellow 1x blue 1x white 5 mm LEDs 5x red 5x green 5x yellow 5x blue 5x white 3 mm LEDs 5x red 5x green 5x yellow 5x blue 5x white 25x 330 Ω resistors 10x 1 kΩ resistors 10x 10 kΩ resistors 10x 100 kΩ resistors 10x 1 MΩ resistors
€ 14,95
Members € 13,46

Pimoroni Pimoroni Maker Essentials - Mini Breadboards & Jumper Jerky
The breadboards can hold your components and circuits and connect them with your circuit board. Includes: 2x mini breadboards 10x short female to female jumper jerky 10x short female to male jumper jerky 10x short male to male jumper jerky 10x long female to female jumper jerky 10x long female to male jumper jerky 10x long male to male jumper jerky
€ 16,95
Members € 15,26
Pimoroni Pimoroni Maker Essentials - Various Headers
Includes: 2x male 2.54mm 2x20 header 10x male 2.54mm 1x20 header 4x male 2.54mm 2x3 header 2x male 2.54mm 1x20 right-angle header 2x male 2.54mm 2x20 right-angle header 2x female 2.54mm 2x20 header 4x female 2.54mm 2x3 6x female 2.54mm 1x10 header 6x female 2.54mm 1x8 header 6x female 2.54mm 1x6 header 6x 2.54mm jumper with handle
€ 11,95
Members € 10,76
Pimoroni Pimoroni NVMe Base for Raspberry Pi 5 (500 GB SSD)
Add super-fast storage to your Raspberry Pi 5 allowing for lightning fast boots, NAS use, and snappy applications! NVMe Base is a PCIe extension board for Raspberry Pi 5. Simply populate it with the included 500 GB M-key NVMe SSD (2230 to 2280 sizes supported) and mount it under your RPi for a compact and fast storage solution. It's the perfect solution for turning your Raspberry Pi 5 into a file server, media centre, reverse proxy, etc. Included NVMe Base PCB with M.2 Slot (M-Key) 'PCIe Pipe' Flat Flex Cable 4x Rubber feet M2 bolt and 2x nuts for SSD mounting 4x 7 mm M2.5 standoffs for base mounting 8x short M2.5 bolts for base mounting 4x long M2.5 bolts for 'pass-thru' mounting with a HAT 500 GB NVMe SSD Downloads Documentation


